How I created a blurred wing flapping effect for the Gears 5: Hivebusters DLC.
The Concept
For the Gears 5 DLC: “Hivebusters” there was a new boss designed for the expansion. The gameplay design was a hovering flying enemy, which created a challenge for the concept team. The end design was a larger than life bird monster with hummingbird like wings. I was working on Gears Tactics at the time, but came over for a week or two to help figure out some issues this design created for the team
The Problem
We are going to immediate ignore the obvious problem. If you really care; basically the Predator is too big to do this, for calorie reasons, and maybe more importantly, the wings are definitely breaking the sound barrier.
The real issue is that if we need to make the wings look like they are moving fast enough to actually support a creature of this side, they need to be nearly blurred out by motion blur. The wings need to do a complete cycle at least 15 times a second. Which immediate brings up our first problem.
Strobing (Aliasing)
When capturing video, we take little slices of the world in time. These are still-frames, nothing about an image can tell you where objects will be next frame, or where they were the last frame. This can create really interesting phenomena when you sample time at a lower framerate than your animation. This phenomena is called aliasing, which if you are in CG you’ve probably heard of, but probably thought it just meant jagged edges. Checkout the wikipedia entry on aliasing to learn more of how these are all basically the same thing.
This is the main problem we have to solve for.
Attempt #1 - Motion Blur
Immediately most people, including myself, jumped to thinking that maybe we can just rely on motion blur for this effect. I mean, this is pretty much what motion blur is for: filling in the gaps between frames. There are two issues with this:
- Motion blur in our engine (and most game engines) is calculated by comparing the vertex position at the previous frame in time and the current frame and getting the vector in screen (clip) space that is then used to blur the screen image. This works great when the amount of motion is relatively small, or all in one direction.
- However, when there is insufficient framerate, between the previous frame and the current frame the wing might end up basically in the same position that it was last frame. So the motion blur will only blur the image ever so slightly.
- You’d have to sample the animation at many different sub-steps and accumulate the blur to fix this issue. That isn’t going to happen at 60fps.
- Motion blur isn’t even enabled on all platforms and modes. Plus players often turn off motion blur ( 😭 ) because they think it is bad. They might be wrong, but it doesn’t stop them from doing it.
The second reason is the real reason that motion blur isn’t going to be sufficient on its own. Still, before I gave up on motion blur I did uncover some interesting ways you can make motion blur do what you want. This didn’t work for us, but it may be something you might want to use in the future.
Using World Position Offset to inform motion blur in Unreal Engine
As mentioned before, the way that Unreal Engine calculates motion blur for skinned meshes is to compare the difference between the vertex position of the previous frame with the vertex position of the current frame. This gives us a clue at how we can give motion blur a hint at what we want to do.
We can use the PreviousFrameSwitch node in a material to change what the previous location is. For example, with a wing flap, we can tell the shader that the previous position of the vertex is at the extents of the animation, or has been rotated heavily away. The blur will still always be a linear smear, but perhaps with enough of an offset we can trick the eye into seeing continuous motion.
This might be useful technique for other effects so here are some simplified examples of what can be done:
Example #1 : Rotate Everything
Left: Visualization of the vertex animation being played on the character in the Previous Frame Switch.
Right: Resulting motion blur as the vertices diverge from the real previous positions.
Left: Visualization of the vertex animation being played on the character in the “Previous Frame Switch.” Right: Resulting motion blur as the vertices diverge from the real previous positions.
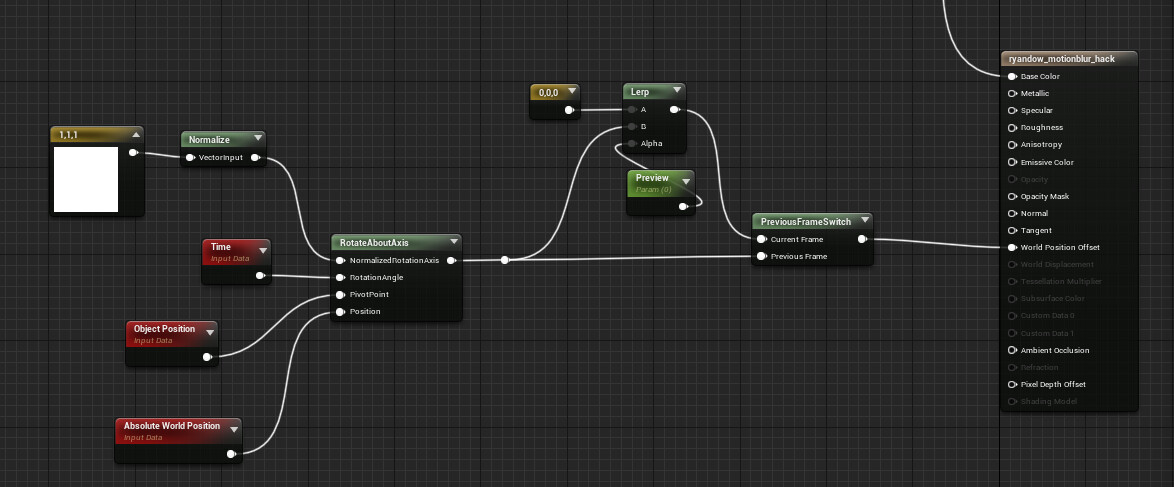
This simplified effect takes the entire mesh and just rotates it around the object’s centroid over time. The preview scalar parameter is just here to visualize where the mesh is being moved to, but should be kept at 0. You can do a lot with a rotate about axis and the previous frame switch.
I leave it to you as the reader to experiment with how you could mask out different parts of the character. For example if you painted your character’s arms with a red vertex color you could mask out the distortion to just the arms of the character, causing their arms to blur
Example 2: Radial Motion Blur
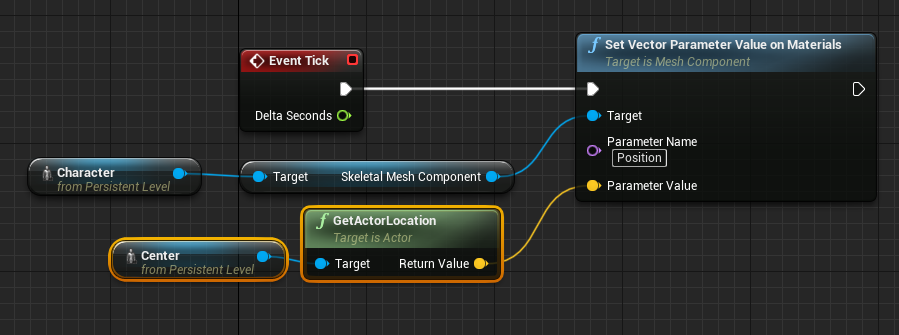
Simple blueprint to pass in the ‘explosion’ position into the material. Anyway you can get the center location you want into the material should work.
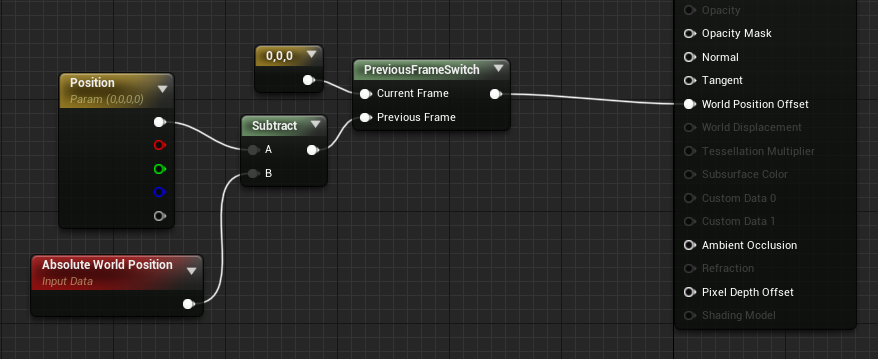
An even simpler material. This just moves all the vertices to a given position for the previous frame, naturally creating a powerful radial blur.
Here is a free related tip. When you want to calculate the World Position Offset you need to move your vertices to a given location:
*Subtract where you want to go by where you are currently. Target Position - Current Position
Attempt #2 - Make it a Helicopter
So motion blur wasn’t going to work. So what about other solutions? The title of this section is both a joke and the real solution. Gears has a lot of helicopter bosses, so one option would’ve just been to make the enemy a helicopter again!
But no, really, what I mean by Make it a Helicopter is get back to the simple VFX of yesteryear, and just do that. These things work for a reason.
This problem I’m describing has been solved in basically every game with a helicopter ever, and the solution is basically always the same.
 '](/generated/unreal/gears-5-predator-dev-log/Untitled-309-47e2b83db.webp)
An attack helicopter in Call of Duty: Black Ops courtesy of: https://callofduty.fandom.com/wiki/AH-1_Cobra
Simple enough. Just a few gotcha’s for us. Helicopter blades in video games are basically all planar, and so can be represented more or less by a single card. Some games will add a second perpendicular card for when you are at a glancing angle, but basically that isn’t necessary.
For us we need a more 3D volumetric solution. So we had to come up with something that does basically the same thing, only keeps the amount of overdraw to just terrible and not cataclysmic, and looks volumetric.
I’ll spare you the failures here. What we realized is that we could approximate the path the wing took by taking a figure-eight card with tubes and distorting it to match the volume of the wing flap animation.
The card creation is a bit specific, since it needed to have continuous UVs from 0-1 for the columns, so that there wouldn’t be duplication on the front and back of the shape.
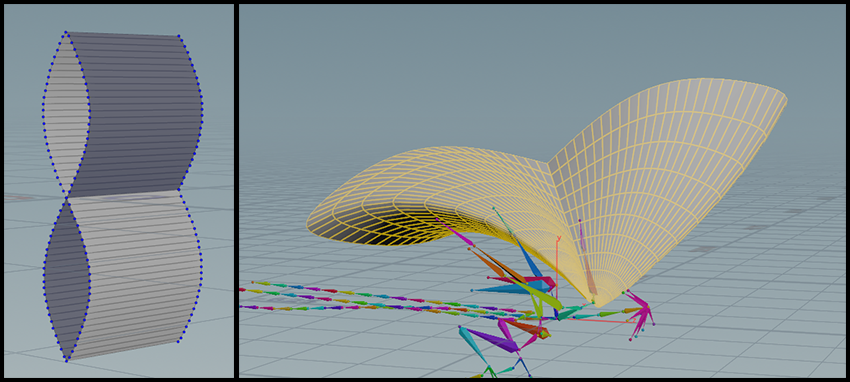
I used Houdini and point wrangles to make sure the shape and UVs were laid out exactly like I wanted them, and also because it allowed me to tune up and down the total number of columns easily without a lot of rework. The card on the left was generated and then skinned with just lattice and bend deformers to more or less match the animation of the predator’s wing flap idle.
Then really all there was to it was panning a static blurred texture along the UVs, and at the same time panning a few different waves of alpha. Here is the breakdown from the top video, just stuck on the visualization so you can absorb just how simple the effect really is.